Wednesday, October 27, 2010

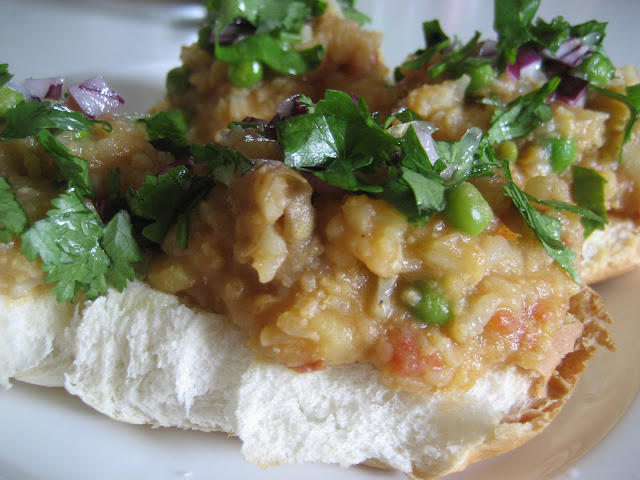
Pav Bhaji--the Indian sloppy joe!


Pav bhaji is a famous Mumbai street food that has become popular all over India and the world.  Mumbaikars have many opinions on the best places to eat pav bhaji in the city, and the best way to make it at home.  Pav means bread, and bhaji means curry, and I tell my non-Indian friends that pav bhaji is the Indian sloppy joe!

There are many amazing Indian home cooks with blogs, and this recipe is my mash up of several recipes.  Check out One Hot Stove, Annaprashana, and of course, Manjula!

We eat this fairly regularly because it is simple and one of Paddy's favorite meals, and we've made it for friends and family all over the continent because the only ingredient you need to get from an Indian grocery store is the masala.  We have been known to travel with our own supply of Pav Bhaji Masala (just in case).


Pav Bhaji
Takes 1 hour
Makes enough for 6 people

3 medium potatoes, chopped into 2 inch pieces
1/2 a large head of cauliflower, chopped into florets
3 or 4 cloves garlic, minced
1 inch piece of ginger, minced
2 small carrots, diced
1 green pepper (or other varieties of sweet pepper), chopped
1 Tbsp. pav bhaji masala (I have heard Everest is the best brand, I also have used Shan brand and MDH)
1 green chile
4 tomatoes, chopped
1 tsp. salt 
1/2 cup peas, frozen works great

6+ buns, I like to get the small ones that are stuck together
1 onion, diced
2 limes, quartered
1 green chile, minced (if you like it hot!)
bunch of cilantro, chopped

Add the potatoes and cauliflower to a large pot of salted, cold water, bring to a boil and cook for about 10 minutes.

Meanwhile, in another large pot, saute the garlic and ginger on medium high heat.  When they began to brown, add the carrots and peppers.  When they began to brown, add the pav bhaji masala and saute for a minute or so, until it gets really fragrant.  Add the tomatoes and green chile, and cook until it gets very thick.  


Eventually the oil will come to the surface, this will take about 10 minutes.

While this is happening, keep checking on the potatoes and cauliflower.  They are done when you stick a knife in a potato and a cauliflower and they slide right off.  Drain, reserving about 2 cups of the water.

Add the drained potatoes and cauliflower to the tomato pot.  Stir and mash adding water as necessary.  Check for spice and add salt and more masala as necessary.  Turn the heat down very low, put the lid on, and let the flavors blend together for 15 to 20 minutes.  If you are not going to eat the Pav Bhajis until later in the day, turn the heat off and let the covered Bhaji sit until you are ready to eat--then just reheat.  Add the peas for the last 5 minutes of cooking.

To serve, heat a griddle or saute pan and toast the buns, with butter if you like.  Top the buns with the bhaji.  Sprinkle with onions, cilantro, chopped green chiles if you are brave!  Top with a squeeze of lime juice.

Eat!

Monday, October 25, 2010

Tomato Bread Soup

I've never eaten bread soup before, but I've always been intrigued by the idea of turning stale bread into a thick soup.  We had half a baguette and the last of the tomatoes from the farmers market and it seemed the perfect chance to try this out.  Since it is cold and I am developing a cold, the idea of a supposedly hearty tomato soup especially pinged my heart.  This one has some Spanish flavours, smoked paprika and a red pepper, but those could be taken out and replaced with simple perfect basil.

Bread Soup
Makes 4 servings
Takes 1 hour

2 cloves garlic, smashed
1 small carrot, chopped
2 small onions, diced
1 not so hot chile (this was from my local farmer's market - not so spicy, a red pepper would be ok)
1/2 tsp. smoked paprika
black pepper
1/2 cup white wine
5 thick slices of stale bread, crusts removed (and saved*), and cut into 2 inch cubes
6 tomatoes, diced
a few sprigs parsley
1 tsp. salt (probably more)
4 cups of water

In a pot on medium high heat, saute the onions, carrot and garlic in olive oil until onions get translucent and begin to brown.  Add the chile, and saute for a moment before adding smoked paprika and pepper.  Stir until the oil looks red, about 2 minutes.


Add white wine, let combine for a minute, and the stir in bread.  It will soak up all the liquid!


Let it sit for a couple of minutes, absorbing, and then add tomatoes and parsley.  Stir a bit, and then let the bread absorb some more.

Add salt and 4 cups of water, bring to a boil, and then reduce heat to low.  Simmer, uncovered for about 45 minutes until the tomatoes are soft and breaking up.


*  I made croutons with my bread crusts!  Toss with olive oil, salt and pepper, and toast in an oven at 350 degrees for about 15 minutes.  Make sure you check on them about half way through.  Great on top of the soup!  If you can stop yourself from eating them right away!

Tuesday, October 19, 2010

We Went Shopping: starting an Indian pantry

This week's Diwali-preparedness post has to do with stocking an Indian pantry.  Indian food is often considered complicated and requiring a lot of ingredients.  It really doesn't have to be, but you do need a very different set of basics than you do for European-ish foods.

I had the great pleasure of traveling this past weekend to see a friend in Rochester.  Abby just moved there to start school, and needed to restock her pantry to make delicious (and cheap) Indian food all winter long.  We went to India House, which has a small but awesome selection of dried, fresh and frozen foods, toiletry items, and also religious icons and holiday supplies.  So if you are looking for diyas to celebrate Diwali with, your local Indian grocery store will probably have them.

We wanted to keep the items basic and the costs down, so that really, with just the addition of fresh vegetables, Abby could make easy, simple dinners.  Here's what I suggest, clockwise from top left.

* Chick peas
* Turmeric powder
* Urad dal
* Massoor dal
* Red Chili powder
* Whole black peppercorns
* Mustard seeds
* Garam Masala
* Cumin seeds
* Asofetida (hing)

The total for these ten items came to $23.00, and along with rice, provide the basis for a whole lotta cooking.  With the addition of green chiles, onions, ginger and garlic, you can make so many recipes, with only these basics and vegetables.

The most perfect comfort food, Pongal, only needs these ingredients, plus the optional addition of ginger and butter.  Or to make basic dal, just pick up some onions, ginger, and green chiles.  Same thing for basic cauliflower curry or potato curry.  A squeeze of lime and a handful of cilantro make these dishes extravagant!

As you come across recipes, for instance, last week's channa masala, you can add, cinnamon sticks and bay leaves to your pantry.  Or to start making south Indian dishes, dried tamarind, sambhar powder, coriander seeds, and methi seeds.  You will start adding different dals and flours.  One day you will eventually have amchoor powder and then you will really have a powerfully stocked Indian pantry.  But it can start with just these 10 things!

Happy cooking!


Sunday, October 17, 2010

I Went Shopping: eating nearly everything at Sahadi's

A new write in to I Went Shopping!  Friend and blogger Olivia at eating (nearly) everything sends in this post from New York City.  Olivia's blog deals with eating with a gluten allergy, and I love that she showed us the gluten-free choices she made.  Sahadi's is a little Middle-Eastern market on Atlantic Avenue in Cobble Hill, Brooklyn.  People love the store for their selection of nuts and dried fruits, and they also have a lot of spices and other things, but I'll let Olivia tell you about it.

"At Sahadi's market on Atlantic Avenue!  Middle-Eastern (and the surrounding areas) delites! AND IT IS RIGHT AROUND THE CORNER from Trader Joe's! So it was an interesting end result bounty.


First picture--

* cerignola olives (green and nutty and hard!) from sahadi's
* gluten free mac & cheese from trader joe's!  gross!
* mini rice crackers (TJ)
* in front of them is a tin can of smoked trout, as I attempt to eat lower on the food chain
* yogurt
* English toffee (trader joe's) WHICH IS AMAZING and covered in pecans - i never buy dessert at the grocery store because it seems like a  "bad idea" even though of course i am going to eat dessert, every day, so i might as well accept it and move on rather than stealing away to the deli like a thief in the night and returning with a pint of Haagen Dazs.
above the toffee is some FIG SESAME JAM--that + goat cheese + olive slice + cracker = a delicious appetizer
* apple
* brown rice pasta (the best kind of gf pasta i have found)
* gf french rolls (not that good, but they were out of my brown rice bread)
* bananas
* avocado (always)
* garbanzo beans (I will make your channa masala!!)
* eggplant, for a Moroccan tajine!


Second picture--the reusable Sahadi's shopping bag
 
Third picture--frozen okra!  What can I make with that?  I remember having some DELICIOUS fried okra in India.... [I'll get working on a post Olivia!  I love Okra too--HiH]

Fourth pic--the fig jam glamour shot.


Fifth pic--yogurt soda (did not buy - cannot carry heavy things like that on the B65 bus!!)

Sixth--orange blossom water!  See above (did not buy) but researched as I was shopping with my cousin and we will be hosting family Christmas this year, orange blossom water sounds like the type of thing one might need for an exciting xmas celebration...

So pleased to be part of the I WENT SHOPPING effort.  

xooxx

olivia"
Thank you Olivia!!  And let us know what you decide to do with the orange blossom water, I love that fragrance.

Monday, October 11, 2010

Channa Masala


Diwali is coming in one month!  Faithful readers will recall that last year, there were two Diwali posts, and they were among the first to be published on this blog.  I am a celebratist, and in preparation for this year's festivities, I've decided to publish Indian recipes in the month leading up to the holiday on November 5.  It is my solemn vow to post at least one Indian recipe a week to help you plan your festivities.

Channa Masala* is one of my favorite foods.  It is so warm and satisfying, and the chick peas have a gentle nuttiness that is the perfect complement to the tangy sauce.  It doesn't have to be super spicy, but when made well, channa masala has a lot of flavor.  This recipe is a perfect balance of tangy, spicy, salty creamy goodness.  This recipe might be the best channa masala I have ever made in my life--so get cooking!


Channa Masala
Takes 2 hours (plus overnight soaking)
Makes 6 (large) servings

2 cups dried chick peas, soaked overnight
2 small onions, diced
2 cloves of garlic, minced
1/2 inch piece of ginger, skinned and minced (an equal amount to the garlic)
1 green chile, halved lengthwise
1 stick cinnamon
1 bay leaf
pepper corns (about 7)
1/2 tsp. Garam masala
2 Tbsp. tomato paste (or 1 large tomato, chopped)
1 Tbsp. salt
cilantro
lime

Drain the pre-soaked chick peas, rinse, and set aside.

In a large, heavy pot, saute the garlic and ginger on medium-high heat for about 2 minutes, or until they become translucent and just start to brown.  Add the onions and one half of the green chile and saute some more so that the onions are translucent and are just starting to brown.  Add the bay leaf, cinnamon stick, pepper corns and garam masala and saute until really fragrant.  Add tomato paste, and saute until the oil becomes red (if you use fresh tomatoes it will take longer).  Add the chick peas, stir together for a few minutes, and then add 6 cups water.  Bring to a boil, then reduce heat, cover and simmer for about 1 hour and 30 minutes.

When the chick peas are soft, add the second half of the green chile.  Check for salt and spice.  Add more garam masala if you like.  When ready to serve, top with chopped cilantro and a squeeze of lime juice.

Channa masala only gets better with time.  So make it earlier in the day and let it sit at room temperature, heating it up again just before eating.  Or even make it the day before and let it sit in the refrigerator over night.

This is great with aloo parathas, Cracked-wheat chapatis, or just rice.  Enjoy!

 Sorry for the bad pictures!  But I just had to post!

*  Channa Masala is also called chole.  It's also spelled chana masala, but I think that spelling is a bad transliteration.  But I'm no expert!

Thursday, October 7, 2010

Curry Turnip Noodle Soup

Turnips are abundant this time of year, and I have been pickling them and making them into curries.  I first got inspired to make curried turnips a few years ago when my mom made a sambhar with turnips.  At first I did not appreciate the sharp nasal tang of the turnips with the sambhar, but the taste stuck with me, and this fall, I experimented with making my own curried turnips.  So good!  Gently braising the turnips brings out their sweetness, and so the final product is sharp and sweet and spicy and salty.  I love curry noodle soups, so I thought this was a chance to see if it would all work together. 

It did!  This is a fusion recipe that brings together East Asian, Indian, and turnip tastes into a hot bowl of yum.


Curry Turnip Noodle Soup
Makes 2 big bowls of soup
Takes 30 minutes

1 bunch turnips, quartered (stems and leaves cleaned and saved)
1 tsp. curry powder (I use sambhar powder)
1 small onion, sliced
1 clove garlic, sliced
pepper
salt
spaghetti (I had some opened already!  any noodles you like will be fine - rice noodles, soba, udon, etc)

Start a pot of salted water for the noodles.

In another pot, saute onion and garlic on medium high heat.  When they've softened, add turnips and brown, taking care to ensure they don't burn.  Then add sambhar powder and pepper, and saute until the sambhar powder is very fragrant, about 2 minutes.


Add 1/2 cup of water, turn the heat down, cover and simmer for 25 minutes or until turnips are soft, but still maintaining their shape.

Meanwhile, cook noodles in pot of already started salted water according to package directions.  For the last minute of cooking add the cleaned turnip greens.  When finished, drain, reserving 2 cups of the pasta water.  Equally divide the noodles and greens between two bowls.

When the turnips are soft, add the pasta water and check for salt.  Add more sambhar powder if necessary.  Simmer for 5 minutes.  When you are happy with the taste, pour the turnips and their broth over the noodles and greens in the bowls.  Happy slurping!

Wednesday, October 6, 2010

Turnip kimchi


I was very excited to get the September Food & Wine, which highlighted recipes by and features about chefs in the South.  One of the chefs made Korean-inspired dishes in Raleigh, and had a couple of recipes for veggie-friendly little pickles.

At the farmers market they've had garlic scrapes and those red onions that come with fat stems.  There's also turnips!  I've been loving turnips lately, so I decided to try the kimchi.  I love every variety of pickled and fermented thing, and this kimchi was salty and and had that great nose feeling that turnips give.  It wasn't spicy enough though--the next time I make it, I'm going for two serranos!

Turnip Kimchi
adapted from a recipe by Andrea Reusing in Food & Wine
Takes 2 days, but only 30 minutes of work
Makes 1 liter jar of turnips

Day 1
1 bunch turnips, trimmed and halved
1 Tbsp + 1/2 tsp kosher salt
4 cups water

Day 2
1 Tbsp + 1/2 tsp kosher salt
4 cups water
3 garlic scrapes
2 small onions, quartered (the kind that still have their stems are great for this--throw the stems in too)
1/4 inch piece of ginger, peeled and sliced
1 serrano chile, halved lengthwise

In a large jar, dissolve 1 Tbsp + 1/2 tsp of salt in 4 cups of water (stir a lot).  When completely dissolved, add turnips.  Cover and let sit overnight.

Drain and rinse the turnips and wash out the jar.  Dissolve the rest of the salt (1 Tbsp. + 1/2 tsp salt) in 4 cups of water in a large bowl.  Place the turnips, the garlic scrapes, the onions, ginger and chile in the jar.  Arrange artistically if you must.  Cover with the brine and  let sit 24 hours.  Enjoy!

Will keep for up to 5 days in the refrigerator.