Sunday, December 11, 2011

Cardamom and Saffron Mandelbrot

I love the holidays!  I love the occasions to gather over food with loved ones, the opportunities to reflect on the year that has passed, and to simply enjoy being together.

I also love the family recipes that get brought out around holidays and the stories that go with them.  A friend and I had an early Hannukah brunch where we made Jewish classics with Indian flavors.  She made curried sweet potato latkes, and I made an interpretation of matzo ball soup (recipe coming soon).  The highlight though, might have been cardamom and saffron mandelbroit, adapted from another friend's family recipe.  It came with instructions from Aunt Alice and my friend's mom, and this post-script: "Aunt Alice was the coolest. She was a big, fleshy, jolly, southern Jewish woman from Atlanta with a drawl and a really sassy sense of humor. I am told that at one point she owned a cat named "Damnit" so she could have the thrill of hollering "Come here, Damnit!" off her porch in the evening."

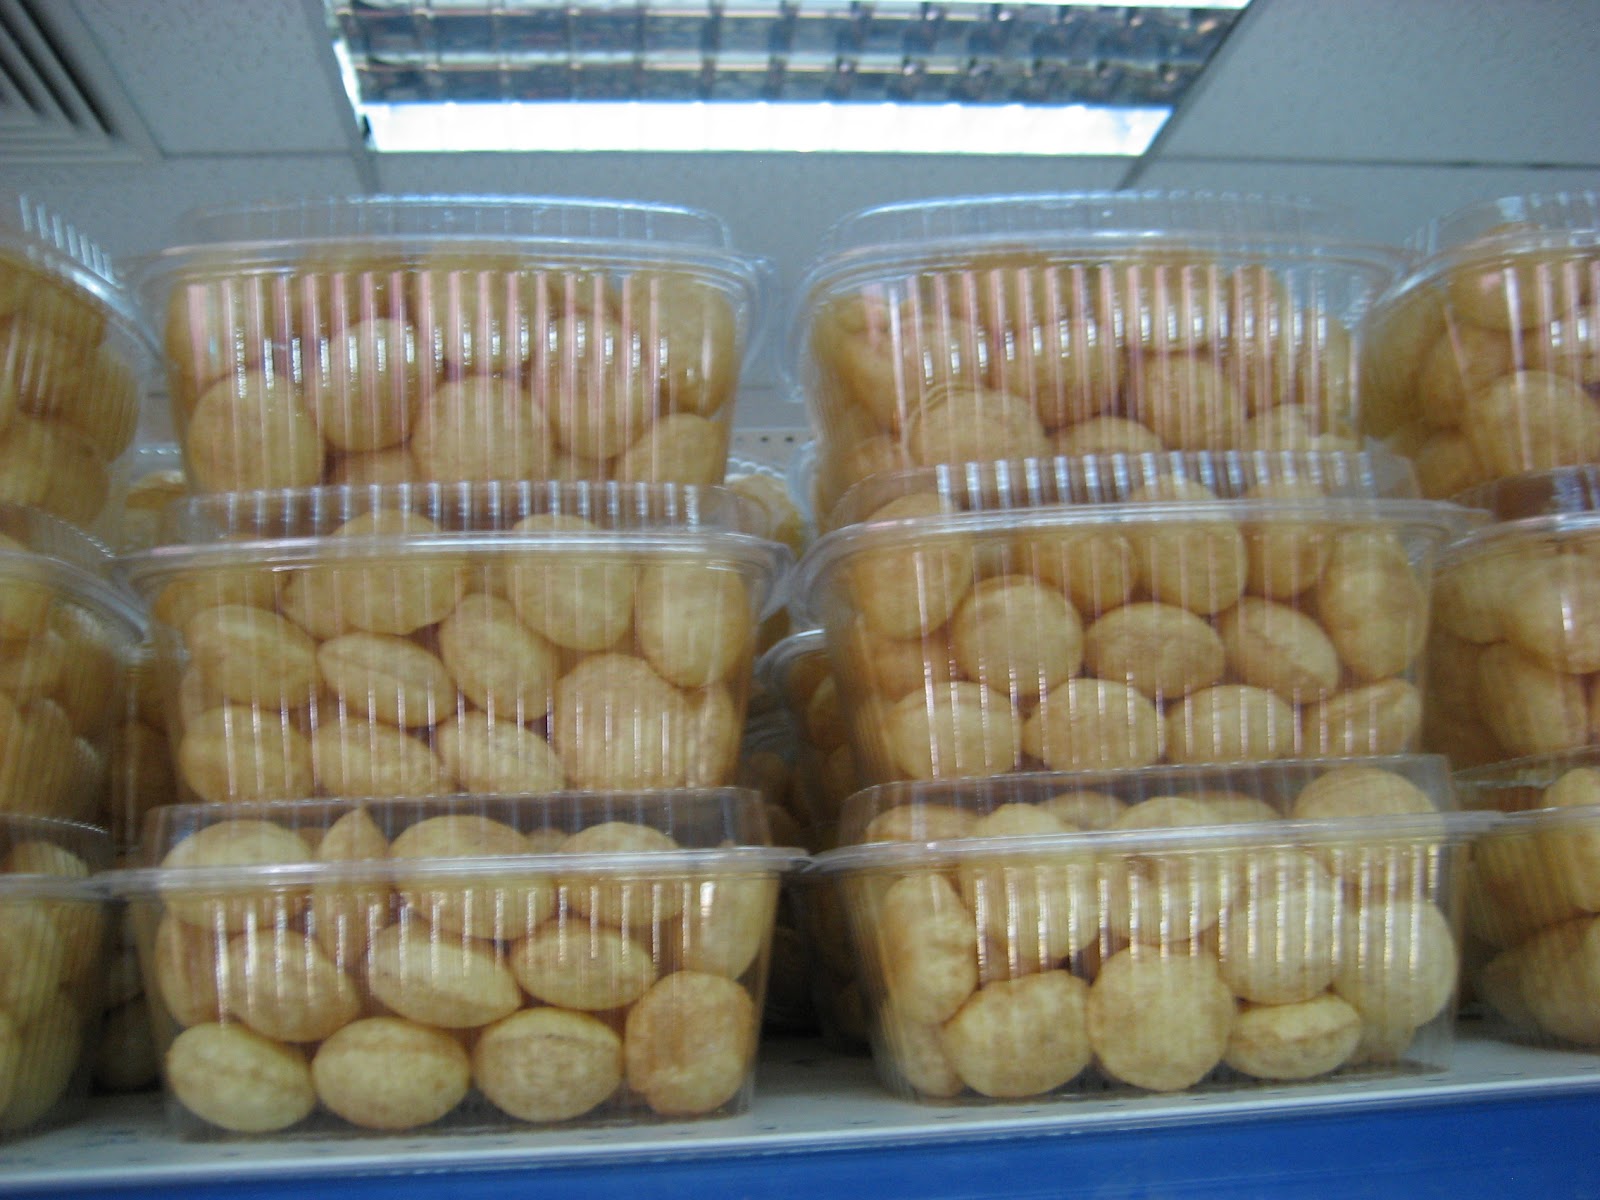
Damnit would totally come running if he smelled these coming out of the oven!  They are delicious--not too sweet, not too hard, but like a cross between a very dry cake and shortbread.  And very nutty too!


I adapted Aunt Alice's recipe for vegans by substituting flax meal and water for the eggs (1 tablespoon flax meal + 1/4 cup water = 1 egg).  Flax meal is a wonderful substitute for eggs in recipes that use them to bind the ingredients together.  It will not help your baked goods rise however!  If you would prefer to use eggs, just switch out the flax meal and water with 4 eggs.


Yum!  Perfect to have around the house for the holidays, or good for any day along with a cup of tea!

Cardamom and Saffron Mandelbrot
Adapted from Aunt Alice's recipe and Nehama Stampfer Glogower's instructions
Takes 2 hours
Makes about 3 dozen cookies

1 cup (plus a little extra) raw almonds
1/4 cup flax meal
1 cup warm water
1 pinch saffron
3 1/2 cups flour
1 tsp. baking powder
1/4 tsp. salt
1 cup sugar
6 cardamom pods, powdered fine
1 cup oil (I used grapeseed, but I wish I had had almond oil)

Preheat oven to 250 degrees fahrenheit.  Toast the almonds for 15 minutes.  When cool, pulverize to coarse meal in a food processor.  Set aside a few tablespoons to dust the cookies.

Preheat oven to 350 degrees fahrenheit, and make sure the rack is in the middle of the oven.

In a large bowl, mix flax meal, water and saffron.  Let congeal while you mix together the ground almonds, flour, baking powder, and salt in another bowl.  Beat the sugar, cardamom and oil into the other wet ingredients.  Add dry ingredients, and stir until combined.

With wet or oiled hands, form the dough into three 'snake-like things', and place them length-wise and evenly spaced on a baking sheet lined with parchment.  Bake for 40 to 50 minutes 'until it looks toasty'.

Mix the set-aside almonds and a little sugar together.

Slide the parchment paper with mandel bread off of the baking tray onto a counter.  Sprinkle the tops of the snakes with the almond and sugar mixture, and cut into even pieces, about 1/2 inch.  

 
Lie them flat on the baking sheet and return to the oven.  Turn the temperature down to 300 degrees.  Bake for 10 minutes to dry them out.  Turn them over, and bake for 10 more minutes.

Thanks Aunt Alice!  Let the holiday baking begin!

Friday, November 4, 2011

Vegan Vegan Kim Chi!

It is here!  The long-awaited kim chi post.  It has now been fermenting in the fridge for 15 days, and it is delicious!  I can't detect a difference in taste over the past week of fermentation, but we'll see how it does in the next week when kim chi recipe writers warn of its growing pungency.  The only concern is that there may not be much left for the taste test!


This recipe is super easy and only requires time.  The kim chi is so tasty, and we've been eating it with so many different things. I reduced the amount of sugar in David Chang's recipe, so the chili flavor is super mellow and secondary to the nosy tingle of the fermented vegetables.  I cut the daikons and carrots into ribbons, and left the garlic and ginger in slices, so that they could be enjoyed for themselves in addition to adding to the over all flavor.  The garlic slices are a real winner!  Although the ginger is a little overpowering for me.  There are many for whom I know that would be a real plus though!

It's amazing to see the pictures from when all the vegetables first went into the jar to the vegetables now! From this:


To this!:


Can't wait to hear about your experiences trying this great recipe! 

Enjoy!

Kim Chi
adapted from David Chang's Momofuku recipe
Takes 1 hour active time, 2 days to 2weeks fermentation time
Makes about 1 liter kim chi (about 1 quart)

1/2 of a large head of napa cabbage, discolored or loose outer leaves discarded
2 Tbsp. kosher salt
1/2 cup of sugar (I used palm sugar, which I had left over from making the fish sauce)
1/2 cup Korean chile powder (if you don't have it, some combination of hot chile powder and paprika would work--Korean chile powder isn't that spicy.  Armenian, or Kashmiri chile powder would work too)
1/4 cup fish sauce (or vish sauce)
1/4 cup light soy sauce
2 teaspoons vegetarian shrimp paste
20 garlic cloves, thinly sliced
20 thin slices of ginger (about 2 inches of ginger, peeled)
1/2 cup 1-inch pieces of scallions (about 8 scallions)
1/2 cup carrot ribbons, sliced with a peeler (about 3 small carrots)
1/2 cup daikon ribbons, sliced with a peeler (about 6 inches of a daikon)

Cut the cabbage in half, lengthwise, and then cut each hemisphere into 1-inch wide pieces.  Separate the leaf-pieces and toss in a large bowl with the salt.  Let sit overnight in the refrigerator.

Combine chile powder, fish sauce, soy sauce, shrimp paste, and sugar in a large bowl.  Add 1/3 cup of water to make a thick, salad dressing-esque liquid.  Add the garlic, ginger, scallions, carrots and daikons.


Drain the cabbage, and add to the big bowl.  Stir thoroughly.  


Place it in a large jar (I used a 3 liter jar), and press the mixture down to release the juices of the cabbage.  I found this slotted spoon best for the pressing.


Make sure as much of the vegetables are under the brine as possible.  Cover and refrigerate.


Will keep indefinitely, but good luck keeping it beyond 2 weeks!

Kim Chi Update--Day 5

Readers of my last post on vegetarian fish sauce will know that a big jar of kim chi has been brewing in my refrigerator.  Today is Day 5, and we took a little out today to eat with our hot lunch--whatever's in the fridge jap chae!


I will post a recipe for this bowl of yummy sweet potato noodles as soon as I remember to write down what I did, but in the meantime, the kim chi is amazing!  I will post a recipe for that soon too, but I mostly followed David Chang's recipe, veggifying it.  It's so good!  Not too spicy or too salty, and just starting to develop that awesome fermented flavor.

We ate it on little fried tofu squares, too.


So good!!!

Monday, October 31, 2011

Nothing Fishy

 
I am committing myself to making more delicious Asian-inspired foods this winter.  I love the care that goes into making beautiful Japanese food.  I love the flavors of Korean and Vietnamese and Thai food.  To get myself started, I looked for a recipe on the web for vegetarian fish sauce.  There are quite a few!  As far as I can tell, fish sauce serves to add salt and umami complexity to recipes.  Most of the time, when I see fish sauce in a recipe, I just add extra tamari.  We'll see what happens when I add my special phish sauce to Veggie Pho, and all the curries and soups I plan on making this winter.


Fysh sauce?  It tastes gingery and sour and sweet and salty all at once.  My first use of the fish sauce is in a big batch of vegetarian kim chi I am fermenting in the fridge.  I'll let you know how it turns out in a couple of weeks!


Vegan Fish Sauce
Takes 1 hour
Makes 1 3/4 cups of sauce

2 cups wakame seaweed, broken up (I think I would use kombu next time)
3 dried shitake mushrooms
4 cups water
4 cloves garlic, smashed
1 1/2 TBSP black peppercorns
1/2 cup tamari
2 tsp. lime juice
2 tsp. lemon juice
2 TBSP rice wine vinegar
3 tsp. palm sugar
1 tsp. fresh grated ginger
1/4 tsp. chili powder

In a large pot, bring seaweed, mushrooms, and water to a boil.  Reduce heat and simmer for 20 minutes.  Add remaining ingredients, bring to a simmer again, and cook for 30 minutes.


Let cool.  Strain into a clean bottle.  Store in the fridge, for up to 1 month.

Your house will smell intense while this is cooking!  Moste Potente!

Let me know if you have a good name to call this stinky sauce by!

Wednesday, October 26, 2011

Happy Diwali Pistachio Ice 'Cream'


This year for Diwali, we had a few friends over for masala dosas and sambhar.  Friends brought a salad and chutney and some tapioca payasam!  We had an amazing gluten-free, vegan meal to accommodate everyone's issues, and no one thought for a second that anything was missing.  My contribution to the desserts, because sweets are the most important part of any Diwali celebration, was a Pistachio Ice 'Cream' adapted from David Lebovitz's recipe.  With real nuts and a can of coconut milk it is so rich!

Enjoy, and Happy Diwali everyone!


Pistachio Ice 'Cream'
adapted from David Lebovitz
Makes 6 servings
Takes 1 hour active time (plus cooling and ice cream churning time)

1 14 oz. can coconut milk (make sure it's good and doesn't have any additives)
5 1/2 tsp. corn starch
1/2 cup sugar
1/2 cup raw pistachios (shelled)
1/2 cup raw cashews
4 cardamom pods, shelled and crushed to a powder

Mix 1/4 cup of coconut milk with the corn starch to make a slurry, taking care to whisk out the lumps.

Heat rest of coconut milk and 1/4 cup of sugar on medium high heat.  Just as it begins bubbling, turn down the heat to simmer, add the slurry, and mix constantly for 3 minutes.  It will thicken right away.  Turn off the heat, let cool, stirring occasionally to prevent a thick skin from forming.  When it's cool enough, put it in the refrigerator.

Bring the raw pistachios, cashews and 1/2 cup of water to a boil.  Remove from heat, and when cool enough, begin removing the skins from the pistachios.  This is tiresome.  You should be able to squeeze the pistachios and the skins should come off neatly, but some times you need to scrub with your finger tips a little for the thin skins.  It's helpful to keep another bowl of water handy to wash your hands. Return the skinned pistachios to the cashews.

When you have skinned all your pistachios, place the pistachios, cashews, powdered cardamom, and remaining 1/4 cup sugar in the bowl of a food processor.  Process, adding the reserved nut-boiling water as necessary to make a smooth paste.  Add this paste to the chilling coconut milk and stir until well-combined.  Chill until you are ready to make your ice cream, or overnight.

Make ice cream according to your maker's directions.  Freeze the ice cream after churning for 30 minutes or so for really nice consistency.

Enjoy!

Monday, September 26, 2011

Adventures in Home Preserving: Tomatoes


We've done it!  Our annual push to preserve as much as we can.   We've already done roasted red peppers, cucumber pickles, and we have dilly beans to do this week!

Our big challenge is always tomatoes.  We try to can at least 25 pint jars of tomatoes each year, and this will last us through the winter for pasta sauces, channa masala, and whatever else we can think to make.

Canning is always better with a friend.  It is madness.  It took about 4 hours on two separate occasions this year.  The tomatoes are first peeled and seeded.  Then, we pack them into jars and cover them with the juice recovered from the seeding.  I make sure everything is as clean as it can be to ensure as many jars stay safe as possible.  In three years of canning, we've never had a bad jar.  This year though, some of the jars that we've been reusing broke during processing.  They must have been slightly cracked or something.  It's so sad to see a floating ghost jar in the water!

It can be scary to can.  It's involved and time consuming, and if you don't do it right, you could have a jar of botulism.  But!  You can do it!  With equipment you probably already have in your kitchen or could borrow from a friend.  Just pay attention and take your time.  It is worth it.  You will have the beautiful tomatoes available now at the farmer's market, all winter long.

There are still fresh tomatoes at the market, but soon, we will be so thankful for these jars!


Whole Tomatoes in their Juice
This is the basic recipe that you will find from the USDA or from contemporary canning mavens like Eugenia Bone
Makes 6 pints (~500 ml)
Takes 3 hours

Ingredients
About 15 pounds ripe and firm roma or plum tomatoes, rinsed and clean
citric acid (available in most grocery stores or health food stores)
basil leaves, oregano, or whatever you wish

Equipment
6 pint jars, with new bands and lids
One very large pot--your jars need to be submerged in water and covered by at least an inch.
A metal tray to fit in the bottom of the pan so that the jars do not directly touch the bottom--they will break from rattling around and the heat of the bottom of the pan.
A very good pair of rubberized tongs, or a jar lifter
One large strainer
One pitcher
One smaller pot
Three large bowls
A knife
One chopstick

Fill your very large pot with water and place the tray inside.   Place your jars inside, standing upright, and make sure the water comes over them.  Now you know how many jars will fit in at once.  Ours holds 8.  Maybe you are lucky to have two very big pots and you can have two going at once.  Bring the water to a boil with the lid on.  This will take awhile, and the jars will be sterilized as they sit in the pot.

Fill your smaller pot, big enough to hold 6 or so of the romas comfortably, with water and bring to a boil.

Prepare one of the large bowls as an ice bath.  Get the other bowl ready for peels and seeds by placing the strainer over it.

When the water in the smaller pot is boiling, add the tomatoes, six or so at a time, and cook for 30 seconds or so, just enough to loosen their skins.  Remove them and place in the ice bath.  Keep on doing this until you have gone through all of the tomatoes.

Remove the tomato skins, the cores and any blemishes.  The tomato skins can go into the strainer, throw the cores and bad spots out!  Get your fingers in the cavities and get out all of the seeds and put those into the strainer.  The seeds make the tomatoes bitter, so getting as many of them as you can out is good.  Place the prepared tomato in the third large bowl.

 
Continue doing this until all of the tomatoes are prepared.  When the strainer gets heavy, press down and agitate to get out all of the juice.  Pour the juice into the pitcher.


Remove the jars from the big pot, very carefully draining them, and place them on a clean towel.  Place the bands in the hot water, and put the lids in a heat-safe bowl.

Place 1/4 teaspoon of citric acid in each of the pint jars.  Add basil leaves or what you wish.  I keep my tomatoes simple because I don't know what will happen to them.

Pack the jars with the tomatoes, pressing them down as you do so, until they reach the shoulders of the jars.  Cover the tomatoes with the tomato juice.  Using a chopstick, or a bread knife, poke around the tomatoes until you are sure that there are no air bubbles.  Fill the jars with more juice if necessary so that there is 1/2 inch of room at the top.

Wipe down the tops of the jars with a wet paper towel so that they will make good contact with the lids.  Pour a few ladle-fulls of simmering water onto the lids to soften the rubber bands.  Place them on the jars, and screw the bands on finger tip tight.  It is the lids that create the seal, not the bands, but the bands have to keep the lids on during the processing time.

Now, carefully, so carefully!, place the jars into your canning pot.  Wait for the water to come to a boil again, now start your timer for 40 minutes.  Keep an eye on the pot so that there is always at least an inch of water above the jars.

When it's time, remove the jars, very, very carefully!  Place them on a towel on your counter (not a wooden surface, we have stains from our first attempts).  Now the fun part, they should all pop!  The most satisfying sound, letting you know that your jars have sealed, and you have tomatoes waiting for you.  Let them sit untouched for 12 hours, and check the seals.  They should be concave and not move when you press them down.  Then store them in the dark for up to a year.

Enjoy your labors!!


Wednesday, September 21, 2011

Lemon rasam

I can't believe I've never posted a recipe for rasam.  It is one of my favorite foods, eaten every day in Tamil Nadu, where my family is from, and now I eat it at least once a week.  There are many different varieties: thakkali rasam, made with tomatoes and tamarind and the most basic; garlic rasam; jeera rasam, made with cumin; milagu rasam, made with lots of black pepper; and some people even make pineapple rasam!  I'm not into it, I have to say.

My favorite is lemon rasam, made with limes, but in my family always called lemon. In India the lemons are small and yellow, kind of like key limes, but in America, we buy limes for rasam.  This rasam is very light, but when well made, it has a perfect balance of salty, sour and spicy.

Now I remember why I have never written a recipe for rasam: no matter how determined I am in the beginning of cooking to keep track of what I am doing, I always forget in the final stages when I add a little more salt, and then a little more sambhar powder. This recipe is a guideline, but you will have to trust your tastebuds to get the flavor just right.  Good luck!  It's worth it.

Lemon Rasam
Makes 2/3 servings
Takes busy 30 minutes

1/2 cup toor dal
2 medium tomatoes, cut into eighths
4 1/2 cups water
2 dashes asafetida
1 1/2 teaspoons sambhar powder
2 teaspoons salt
12 curry leaves (one sprig)
1 teaspoon mustard seeds
big handful cilantro, washed and chopped
1 lime, halved

On high heat, bring toor dal and 2 cups of water to a boil.  Reduce to a simmer, cover and let cook until lentils are done, about 20 minutes.

Meanwhile, in a pot, bring to a boil tomatoes, water, asafetida, sambhar powder, salt, and curry leaves.  When it boils, turn it down a little, and let boil until it has reduced a bit and the tomatoes are cooked, about 15 minutes.  You will have to taste it: it should taste both spicy and salty, but not too much of either.  You might need to put in more sambhar powder, then it might need more salt.  When it tastes balanced to you--the right amount of salty and the right amount of spicy but not too much of either--then it's done.

In a little pan, heat oil on high.  When the oil is hot, put the mustard seeds in the pan, and when they pop, take off heat and pour into rasam.  

When the lentils are cooked, drain if necessary, and pour into rasam.  Squeeze one lime half into the rasam.  Taste.  Maybe it will need more lime, squeeze another half in.  Taste it again.  Good?

Then you are done!  Top with cilantro.  Rasam is good on its own, or you can eat it with rice and vegetable curries.  My favorite combos are lemon rasam and Green Beans Parappusili, or Spinach and carrot salad!


Sorry I haven't posted in a while.  It's been a busy summer!  More soon.

Thursday, April 28, 2011

Sorta Vegan Fat Rascals for Yorkshire Lass Kate

Maybe you have heard that Prince William is marrying Catherine Middleton, a woman whose family includes a Yorkshire miner!  This labouring ancestor has led many to anoint Kate a commoner, and just like the millions of working Britons (and Canadians and Australians and Jamaicans) who will one day be her subjects. I learned from the very good Channel 4 documentary, Meet the Middletons now showing on Bravo and E!, that her ancestors also include Leeds solicitors and mill owners.  The show highlights her social-climbing grandmother on one side, and on the other side, the deaths of her three great-great uncles in the Great War, which allowed for the establishment of a trust for their sister's family (we don't need to go into sexist inheritance laws that wouldn't allow this sister to come into the family money (or go into the family business) in her own right).  This trust allowed for the education of Catherine's father's family, and helped pay for her expensive private schooling.

OK OK, I digress, this is a blog about food after all.  It kind of makes me uncomfortable all the discussion of her blood and the royal line!  Very Harry Potter.  One thing is clear: the lady had a lot of ancestors in Yorkshire.  On my trip to England last month, I went to York and visited the famous and very popular Betty's Tea room.


That was the line to have tea in the tea rooms!  Their most famous baked good is a fat rascal, a yummy, fruity scone, topped with a rascal-y grin.


Here's a sorta vegan recipe in case you are waking up early to watch the big event, or, are just looking for something to eat with tea!

Be careful!  These little scones inspired rascalry!

Fat Rascals
Inspired by Betty's and adapted from the Elmwood Inn's recipe
Makes 6 scones
Takes 1 hour

1-3/4 cups all-purpose flour
1/2 teaspoon baking powder
Pinch salt
4 ounces vegan margarine
1/3 cup granulated sugar
zest of one orange
zest of one lemon
1/3 cup currants
1/4 cup milk, plus more for glazing
6 maraschino cherries, halved
18 blanched almonds

Preheat oven to 375 degrees fahrenheit.  Line baking tray with parchment.

Mix together flour, baking powder and salt. With your fingers, work in the margarine until the mixture resembles breadcrumbs.  Mix in sugar, zests and currants. Add the milk and bring the dough together.

Divide dough evenly into 6 balls, and place on baking sheet.  Flatten, and make the rascal faces with 2 maraschino cherry halves for eyes and 3 almonds for teeth.  Glaze the rascals generously with milk.  This is what makes them brown nicely.

Bake for 25 minutes or until golden.They are even better the next day--if you can wait!

Tuesday, April 26, 2011

The Last of the Winter Cabbage

Readers in the northern hemisphere, maybe you too have been struggling all winter to cook the cabbage that comes in your CSA boxes, that is the only local vegetable in the market, that is cheap and fresh-looking in a sea of expensive and sad vegetables.  I have been experimenting with cabbage recipes all winter, and have to say, have not been excited with the results.  There was cabbage in Japanese-inspired soups, a failed attempt to make sauerkraut, and all varieties of curries!   At last though, an unqualified cabbage success!  Here is a great cabbage and lentil curry that is so yummy and satisfying with rice, with some of Manjula's parathas, or even, thinned out as soup.  Now that other vegetables have returned to the northern hemisphere, the recipe is, perhaps, a season too late.  Because cabbage is cheap and available, it has a reputation as a vegetable of last resort, but, undeserved!  You could save this recipe for next winter, or better yet, even though there are other, more exciting vegetables in the market, choose reliable, delicious cabbage.


Cabbage Curry with Lentils
Makes 6 servings
Takes 1 hour

1 1/2 cup channa dal
salt
turmeric powder
1 teaspoon mustard seeds
2 teaspoons cumin seeds
asofetida
10–12 curry leaves (from one sprig)
2 onions, chopped
3 cloves of garlic, chopped
2 inch piece of ginger, peeled and chopped
1 green chili, sliced lengthwise
2 tomatoes, chopped
1/2 a giant head of cabbage, washed and chopped (easily 2 pounds or about 6 big handfuls)
red chili powder
garam masala or sambhar powder

Soak the channa dal in water for about 30 minutes.

In a sauce pan, bring channa dal, some salt (1 teaspoon for now), and some turmeric (1 teaspoon) and a lot of water to a boil.  Cover and simmer for 30 minutes, or until channa dal has softened (they will still retain their shape and be a little tough in the middle.  this is ok).

Meanwhile, in a large saute pan or a stock pot, heat some vegetable or canola oil (to cover the bottom of the pan) on high heat.  When it's hot, add the mustard seeds.  When they begin to pop, throw in the cumin seeds.  When those begin browning, add a couple of shakes of asofetida and the curry leaves.  Let saute for just a minute and then add the onion, garlic and ginger.  Saute until soft and let sit for a bit so that the bottom begins to brown, it makes it better!


Add green chili and tomatoes, some turmeric and chilli powder to taste, and saute, until the tomatoes break down, making sure to scrape up the brown bits at the bottom of the pan.


Add the cabbage, some salt, and one cup of water, carefully stirring the cabbage into the masala.  When it is all combined, lower heat, cover, and let simmer until the cabbage is softened, 10 to 15 minutes.  Keep checking and turning the cabbage to make sure it cooks evenly.

Check on the chana dal.  Once it is ready, add the dal, and as much of the dal water as necessary to the cabbage to make a saucy curry.  Add more dal water if you would like to eat as soup, a little less if you are eating it with rice or parathas.

Stir it all together, check for salt and spice.  When you are happy, sprinkle with garam masala or sambhar powder, whichever you prefer (I used sambhar powder).  Top with cilantro if you have it.  Enjoy!

Thursday, March 31, 2011

I Didn't Go Shopping: Springtime in England

Readers--it's spring!  I've left snow in North American Halifax to discover that things are alive and blooming in the other Halifax.


I'm back in the United Kingdom, in Yorkshire this time. I came to England's Curry Capital, Bradford to research the south Asian immigrants who have been living here for over fifty years. They came to work in the wool mills that defined Bradford since the nineteenth century.  The mills closed down in the early 1980s, and they remain empty today.


More recently Bradford achieved infamy when some people burned copies of Salman Rushdie's Satanic Verses, setting off a big debate about multi-culturalism and what that means, that continues today.

The city is not the most cheerful place, but there's a lot going on, and so much new construction.  People live here, and they are making the best of it. You know how I love my little markets, and I've found several here in Bradford. I didn't buy anything, but I looked!

 Little puris

so much supari

so many chilis!
syrups for serbeth


Unfortunately, I'm not here long enough to do a lot of cooking.  As much as I thought the South Asian food scene was going to be the most interesting thing to discover on this trip to England, I've been more taken with another food to do.

I've discovered plans for the royal wedding.  You may have read that Kate chose a traditional fruitcake with 'Joseph Lambeth technique' icing.  I didn't know people did fruitcake for weddings, it sounds delicious to me. And apparently they are going for 'traditional and elegant' with that Joseph Lambeth technique icing. I wonder if it will be all white.

While the happy couple and their 1,900 guests are eating cake, you can help yourself to some pie. I saw these at the grocery store the other day.


Nothin' says lovin' like "a dash of brandy in lovely pastry."

Dandy!  To wash down your pie, Schweppes encourages you to celebrate the perfect couple, Prince William of Wales and Miss Catherine Middleton, with what else, a Pimm's Cup.


I asked the people I am staying with and their friends if they were paying attention to the wedding.  At first they said no, but then they slowly started bringing out one by one all the details they knew about the couple. The fashion show at St. Andrews, Kate's pictures of William in her childhood bedroom, Diana's engagement ring.  I asked why weren't they against the monarchy.  A young man said the royal family brought in way more money for the country than they cost. At first silence to a pragmatic answer, and then a young lady said, 'but it's nice!' and there was suddenly a chorus of 'yeah, it's nice!' in the room.

Many people have said that the wedding is something for everyone to be cheerful about, a moment of renewal that will bring the whole country together.  Springtime for Britain and the Monarchy.  And while we might not be invited to the 'traditional and elegant' wedding, at least they're letting us drink Pimm's.

Unless you keep halal of course, like many of the South Asians in Bradford.  In that case, no beef and bacon pie, and no alcoholic Pimm's cups.  Perhaps multi-culturalism has failed, but now, if being part of the 'whole country' means celebrating 'tradition and elegance' I'm not sure that's so nice.